Printrbot simple 1405 (Rev F) 3D Printer Startup Guide
The following little post is intended to help those just wanting to both learn about 3D printing and/or wanting to know how to setup their printrbot simple 1405 (F revision). Note these are the steps I followed, yours might differ slightly. Please read the whole post before starting any individual step, it will make the process and end goal much more clear to understand.
- First you should start by assembling the printer (this might take 1-3 days depending on your availability and endurance :))
- Then download the repetier host open source software to communicate with your printer
Make sure you get some blue painter’s tape and tape the surface of your printer bed, this tape is perfect for 3D printing PLA.
- Then you should continue by calibrating the x, y, z axis and extruder motor.
Follow the great instructable by mrakuaku:
- Once you have completed the calibration setup you should proceed to calibrate your auto leveling sensor.
Printrbot has a nice tutorial for helping you calibrate your auto leveling probe:
Auto leveling Calibration Helpful Notes
Manually leveling the auto leveling z. sensor.
I started by making sure the sensor was close to the bed (such that a sheet of paper can pass snuggly in between the bed and the hot end). Then go ahead and issue the “go to home x,y,z instruction in repetier” Be ready to pull the power if the hot end extruder hits the bed to prevent scratches or damage to the extruder.
Software auto leveling calibration.
Use repetier host to send g-code commands to provide more fine calibration to your auto leveling probe.
Test your calibration by printing the small calibration cube STL file:
- Once you have your auto leveling probe calibrated you need to go over the settings for the slicers (Cura or Slic3r); Slicers are the ones that break your cad model into thousands of small printable layers. Getting these configured correctly will allow you to get some really nice prints. Make sure you understand what each setting means (see the bottom of this post).
You can use the following file as a good starting point for Cura.
And the following linked_files as a good starting point for Slic3r
Then do a few quick prints using the 5mm calibration cube with steps to test the quality of your print, play with the settings until you get the quality and speed you desire.
Here are some of the settings you will find in these linked_files and how they translate in simple language.
Layer Height This is the thickness of each layer as it is printed, a lower height implies better quality but longer printing times, down to the actual best resolution for your printer.
First Layer Height This is important; your first layer height should be thicker, printed slowly and preferably with a large extrusion width (the width of the individual plastic lines) for best adhesion.
Infill Infill is the actual material that goes inside the volume of your part, i.e. very often you don’t need to print a completely solid plastic part, it can be partially “hollow” inside. You can determine how much plastic you want by setting the infill density, most of the time a figure around 15 - 20% should be enough.
Speed There are many speed settings that affect the performance of your printer some of the most important ones are
perimeter’s speed This is how fast you print the outside plastic surface of your part (external perimeters) or the outside surface of small features inside your part (e.g. holes, pockets …etc). You should make sure you keep this speed relatively low for getting nice smooth surfaces.
infill speed This is the speed that you will use to print the inside volume of your part. Since the inside plastic of your object just serves as plastic volume, you can print the infill plastic relatively fast with no cosmetic issues.
support material speed Support material is placed to keep overhangs from simply slewing down to the bed of the printer. I try to print my support structures relatively slow.
Non print moves (travel moves) as the description implies this is the speed of the extruder when it is just moving from one coordinate to another but without extruding any plastic. You can keep this figure pretty high without affecting the quality of the print.
Skirts, Brims and Rafts Please refer to the following article for an in depth understanding aticle link
Skirt Having a sufficient skirt is very important. It is just a few loops of plastic around your object with the main purpose of priming (cleaning) your nozzle so that by the time you start printing it is clean.
Brim Brims come in very handy when the base of your part has a small surface area, therefore you can provide a brim; a large surface of plastic around the base of your part, since brims increase the relative base surface area of your part, it increases adhesion significantly.
Raft Rafts sometime come useful when you want a very large complete surface area for your parts to sit on top. Please note that while the plastic-bed adhesion is excellent, removing your parts from the raft can be troublesome and some tinkering with the raft settings to make the removal easier is sometimes necessary.
Support material Support material is used to allow you to print objects with no underlying plastic e.g. think about printing a bridge, what holds the molten plastic in the middle of the bridge from falling down? We use support material to allow the printer to print overhangs nicely. make sure to play with the support material pattern type, spacing and angle to find the best configuration.
Temperature Normally for PLA, around 200 C would work nicely, make sure you increase the temperature of the first layer a good combo is:
first layer temp: 215 C all other layers: 205 C
Filament Diameter Just the thickness of the plastic you are feeding to your printer. 1.75 mm for the standard printrbot 1405 configuration
Bed size: Simply how big is the printable volume of your machine. For the printrbot simple a lower 88 mm for x, y and z works quite well.
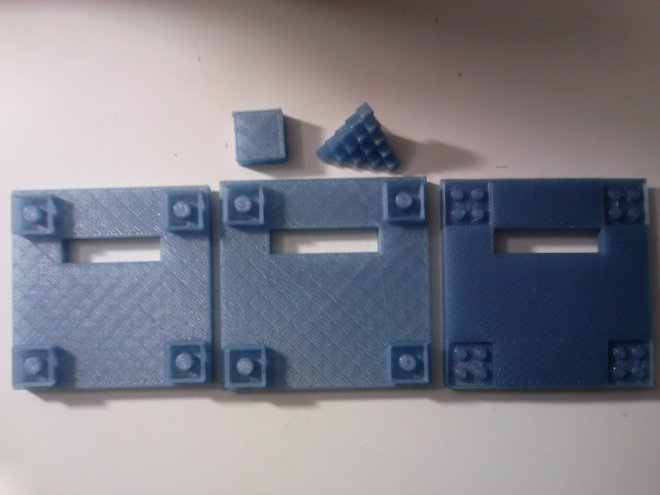
And finally some pictures of my latest prints.
In order from top to bottom, left to right: calibration cube, calibration steps, structure 15% infill density (40 mins), structure 20% infill density (45 mins), structure 100% infill density (1hr:20mins)
Happy printing :)
Leave your comments below (or comment directly here).
Thank you for your feedback.